
Quick Summary
When an automatic garage door reverses unexpectedly or refuses to close, malfunctioning or misaligned safety sensors are almost always the primary cause. Homeowners can often fix garage door sensor problems independently by cleaning dirty lenses, checking for corroded low-voltage wiring, and adjusting the bracket angles until the indicator LEDs remain solid. This guide provides step-by-step diagnostic and safety-testing instructions so you can restore normal operation or contact Reliable Garage Door Service Port Charlotte when professional calibration or replacement is required.
Fix Garage Door Sensor Fast – Restore Safe Door Operation
When your garage door refuses to close, starts heading down and immediately reverses, or the opener motor clicks and flashes its light, the safety eyes are almost always the cause. Photoelectric sensors sit near the floor on both sides of the door track to create an invisible infrared path. If anything interrupts that beam, the motor stops the door from closing to protect people, pets, and property.[2]
Garage doors sold after January 1, 1993 have been subject to federal safety requirements that include auto-reverse protection and photoelectric safety sensors. These components are specifically designed to detect path obstructions and prevent entrapment injuries. As noted by specialists at Reliable Garage Door Service Port Charlotte, while some homeowners look for ways to perform a garage door sensor bypass, many modern opener systems are designed not to permit normal remote operation without an active, functioning sensor circuit.[1]
Below is a practical guide to garage door sensor troubleshooting, covering everything from simple alignment checks to diagnosing low-voltage wiring faults.
Quick Diagnosis: How to Fix Garage Door Sensor Problems
Before buying replacement parts, take five minutes to run through basic diagnostic checks. Most sensor problems come down to one of these issues:
- Physical misalignment: One or both brackets got bumped by a trash can, lawnmower, or foot.
- Dirty or blocked lenses: Spiderwebs, dust, or moisture covering the photo eye.
- Bracket movement: Vibrations or minor shifts moving the mounting bracket just enough to pull the beam out of line.
- Low-voltage wire corrosion: Oxidation or loose splices along the bell wire connecting the sensors to the overhead motor.
Understanding Sensor Indicator Lights
Need fix garage door sensor?
We’re available now — call for a fast, free estimate.
Most modern openers from brands like Chamberlain, LiftMaster, Craftsman, and Genie use small LED status lights directly on the sensor housings to show system health.
Chamberlain and LiftMaster Systems
On standard Chamberlain garage door opener setups, you will notice one amber (yellow) light and one green light across the doorway:
- Amber/Yellow light (Sending sensor): A steady amber light means the sensor has power. It transmits the infrared beam. This light stays on regardless of alignment as long as it receives low-voltage power from the motor unit.
- Green light (Receiving sensor): A steady green light means the receiving eye is catching the beam from the sending unit. If this light is off or flickering, the sensors are misaligned, dirty, or dealing with broken wiring.
- Garage door won’t close sensor light on: If both LEDs are solid but the door still reverses, check the force settings on your opener or look for mechanical resistance along the vertical tracks.
Genie Systems (Safe-T-Beam)
If you need to fix Genie garage door opener sensors, the color codes differ slightly:
- Red LED (Sending eye): Should stay solid red.
- Green LED (Receiving eye): Should stay solid green. A blinking red or green light on a Genie system signals that the beam is blocked, the lenses are out of alignment, or there is an issue with wire continuity.
How Do You Know If a Garage Door Sensor Is Broken or Misaligned?
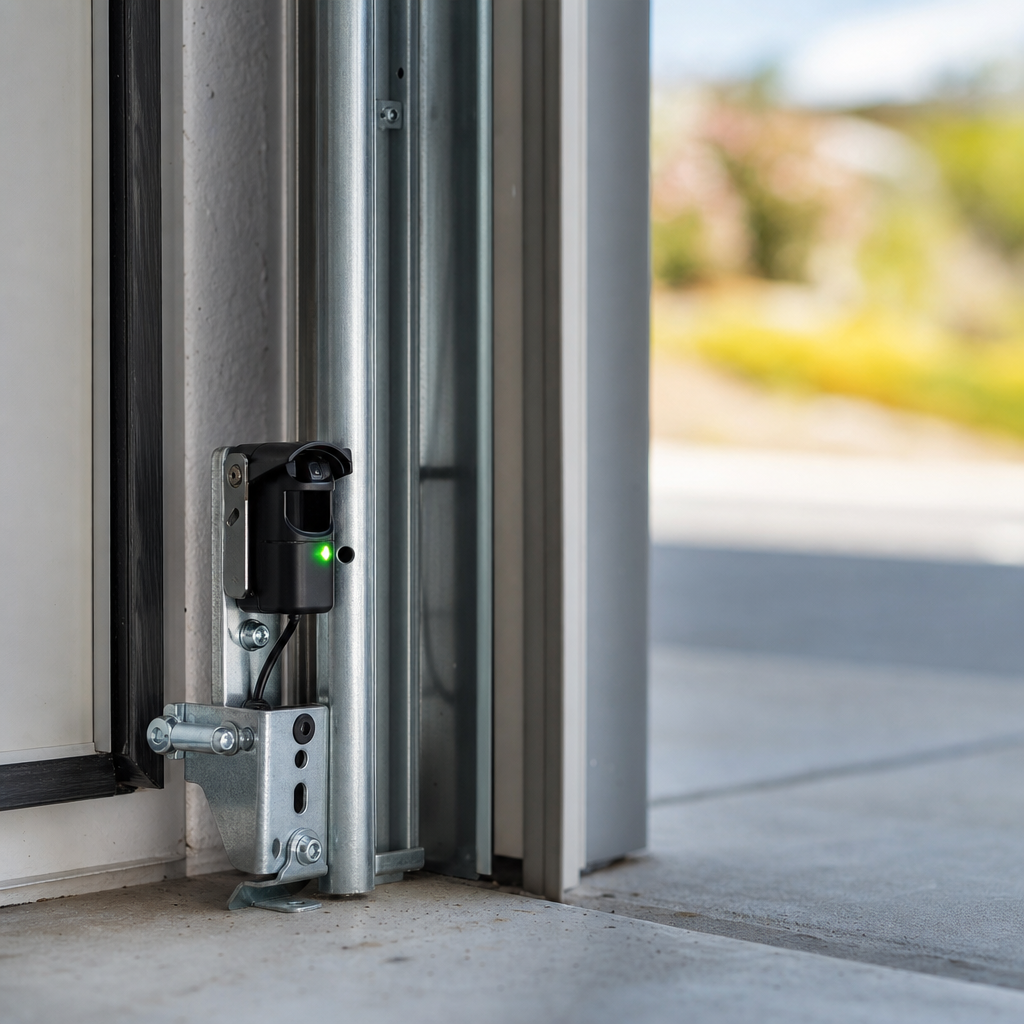
Determining whether a sensor is broken or simply knocked out of alignment takes just a few steps:
- Check the LED status on the receiving eye: If the light flickers when you lightly wiggle the bracket, the sensor is functional but loose. Tighten the wing nut or bracket screw once the light remains steady.
- Check the sending eye: If the sending sensor (the yellow light on Chamberlain or red light on Genie) does not light up at all, the unit is not receiving low-voltage power from the overhead unit.
- Test for low-voltage splice corrosion: In humid or coastal areas, bell wire connections joined with standard wire nuts or electrical tape can corrode over time. Even if the wire looks connected from the outside, internal copper oxidation creates electrical resistance that prevents the sensor from powering up. Strip back the wire to clean, shiny copper and reconnect it with gel-filled moisture-resistant crimp connectors.
Step-by-Step DIY Sensor Troubleshooting
Need fix garage door sensor?
We’re available now — call for a fast, free estimate.
1. Clean the Safety Lenses
Dust, pollen, and spiderwebs regularly settle over the small glass or plastic lenses. Use a soft, dry microfiber cloth to clean garage door safety sensors gently. Avoid harsh chemical cleaners, as they can fog the plastic housing over time.[3]
2. Adjust Garage Door Sensor Alignment
To align garage door safety sensors properly:
- Loosen the wing nut holding the receiving eye to its track bracket.
- Sight down the line toward the sending sensor on the opposite side.
- Slowly pivot the receiving eye up, down, and sideways until its indicator LED turns solid.
- Carefully tighten the wing nut by hand without twisting the housing out of line.
- For wide two-car openings, attach a taut string line or a small laser pointer between the two sensor bodies to confirm they are sitting at identical heights (typically 4 to 6 inches off the concrete floor) and pointing straight at each other.
3. Test the Auto-Reverse Safety Features
Once the lights are solid, verify that the auto-reverse system functions correctly:
- Cardboard obstruction test: Place an empty cardboard box (at least 6 inches tall) on the floor in the door path. Press your wall button to close the door. The door must stop and reverse immediately upon breaking the photo eye beam, without contacting the box.
- Physical contact test: Lay a standard 2×4 block flat on the floor directly beneath the center of the door path. Close the door. When the bottom edge contacts the wood, the internal mechanical force limit must reverse the door within two seconds.
Safety reviews analyzing historical data, including a multi-year review by the Canadian Hospitals Injury Reporting and Prevention Program (CHIRPP) between 1990 and 2005, found no apparent upward or downward trend in door-related injuries over that span.[4]
Garage Door Sensor Replacement and Professional Help
If cleaning, realigning, and inspecting the wiring does not resolve the issue, one of the sensor heads or the opener logic board may have failed internally.
Replacing the sensors yourself with an OEM replacement kit is an option if parts are needed. If you hire a professional garage door technician, such as the team at Reliable Garage Door Service Port Charlotte, service typically includes replacement hardware, wire testing, alignment, and full safety testing of the door system.[5]
Frequently Asked Questions
Why is my garage door sensor light blinking or yellow?
On Chamberlain and LiftMaster openers, the sending sensor always displays a solid yellow or amber light to confirm power. If the green receiving light is blinking or off, the sensors are misaligned, dirty, or disconnected. On Genie systems, a blinking light indicates an optical blockage or internal wiring fault.
How do I align garage door safety sensors properly?
Ensure both brackets are mounted at the exact same height off the floor (4 to 6 inches). Loosen the wing nut on the receiving sensor and adjust its angle until the LED indicator stops blinking and turns solid, then tighten the bracket firmly into place.
How do you know if a garage door sensor is broken or bad?
If the sensor has verified low-voltage power at the terminals (checked with a multimeter) but the LED fails to light up, the internal diode is bad. Similarly, if the sensors are aimed directly at each other at short range but the receiving LED will not turn solid, the unit must be replaced.
Can dirty lenses cause garage door sensors to malfunction?
Yes. A light coating of dust, spiderwebs, or moisture can scatter the infrared beam enough to break the connection, causing the door to reverse as if an object is blocking the path.
How much does it cost to replace garage door sensors professionally?
Professional repair and replacement costs vary depending on the required parts, labor, wiring repairs, and adjustments needed for the safety reverse system.
How do I test if my garage door safety sensors are working?
Start closing the door using the remote or wall button, then wave a broom handle or cardboard box across the infrared beam about 5 inches above the floor. The door should immediately stop and reverse upward, and the opener light bulbs will typically flash to signal an optical obstruction.
When should I call a professional garage door technician?
Call a qualified technician, such as Reliable Garage Door Service Port Charlotte, if your sensors have solid lights but the door still will not close, if you suspect broken wiring inside finished walls, or if the opener logic board fails to deliver low-voltage power to the sensor terminals.
Need fix garage door sensor?
We’re available now — call for a fast, free estimate.
Sources
- Injury patterns and epidemiology of automatic door-related … – pubmed.ncbi.nlm.nih.gov (2026)
- Safety Commission Publishes Final Rules For Automatic … – cpsc.gov
- Garage Door Safety Technology: Sensors and Smart Systems – homesafetyauthority.com (2018)
- Garage Door Injury Analysis in America – elicit.com
- [PDF] Injuries associated with opening and closing of garage doors – phac-aspc.gc.ca (2006)
Frequently Asked Questions
Can direct sunlight cause garage door sensors to malfunction?
Yes, intense sunlight shining directly into the receiving lens can wash out the infrared signal and cause the door to reverse unexpectedly. You can shield the sensor with a small sunshade or have Reliable Garage Door Service Port Charlotte swap the physical locations of the sending and receiving eyes so the receiver faces away from direct sun exposure.
How can I close my garage door if the safety sensors are broken during an emergency?
You can manually override faulty sensors by pressing and holding the hardwired wall-control button continuously until the door is completely closed. If you release the button before the door reaches the floor, it will reverse automatically, so you should contact Reliable Garage Door Service Port Charlotte to replace the damaged sensors before relying on remote controls again.
How do I determine if my opener logic board is bad instead of the sensors?
Test the sensor terminal screws directly on the overhead motor unit using a multimeter to check for standard low-voltage DC output (typically 4 to 6 volts). If proper voltage is present at the powerhead but direct short-wire testing of the sensors fails to illuminate the LEDs, the sensors are bad; if no voltage leaves the motor terminals, the internal logic board has failed.
About the author
 |
Brian Thompson Brian is a certified garage door technician with over eight years of experience serving the Port Charlotte area. He specializes in residential garage door repair and the installation of modern opener systems. Before focusing on garage door mechanics, he earned an Associate Degree in Construction Technology from Florida SouthWestern State College, giving him a strong foundation in building safety and structural integrity. |
Garage door broken, stuck, or off track?
We’re available now — call for a fast, free estimate.
Get Started